Introduction
Gatsby 4 introduced a lot of new features, most notably the introduction of additional rendering options besides Static Site Generation (SSG): Deferred Static Generation (DSG) and Server-Side Rendering (SSR). If you missed this exciting release you can catch up in the blog post What’s New in Gatsby 4 (opens in a new tab) after following this tutorial.
So why should you care about Deferred Static Generation? In a nutshell it delays (or defers) the generation of pages until a user actually requests the page. After that the build artifacts (HTML & JSON) are cached at the CDN level and for all visitors afterwards it behaves like a normal SSG page. In a scenario where you build thousands of pages but only a subset of them gets regular visits from users, DSG can dramatically improve your build speeds. And you still get the SSG benefits like great SEO, speed, and reliability.
In choosing what pages to defer you can improve your page on a granular and individual level – but for how you’d do this the sky is really the limit. In this tutorial I’ll explain how you can use data from your analytics tool (like Google Analytics, Plausible Analytics (opens in a new tab), Fathom (opens in a new tab), etc.) to programmatically defer pages that are not popular, only building your top pages as SSG. By the end of this tutorial, you’ll be able to create a source plugin for your analytics tool (if it doesn’t exist yet) and use that data to defer pages in your site.
If you want to follow this tutorial step-by-step you’ll need to have a couple of accounts for the online platforms in this guide. You need to have a Netlify account (opens in a new tab) and an account on GitHub (opens in a new tab) or GitLab (opens in a new tab). Since I’m personally a big fan of Plausible Analytics (opens in a new tab) it’ll be used in this tutorial. You can’t create a free account there (but start a 30 day trial), so if you need something free you can use Google Analytics.
If you haven’t set up your development environment yet, you can follow Part 0 of the official Gatsby tutorial (opens in a new tab) to do so.
Lastly, you should already have a Gatsby site locally or on GitHub/GitLab that you can work with and connect to Netlify.
#Conceptual Guide
Before I begin to explain the actual steps you need to take, let me take a step back and explain the concept on a high-level. The problem statement is: You can mark pages as deferred, but what should be the differentiator? And one (of probably many) solutions is to take the data of your analytics tool via their API and use that to mark the pages.
So in short:
- Pull data from analytics tool via their API.
- Use a common but unique identificator (e.g. the URL of the page) to connect the analytics data to each page node to allow a direct comparison.
- Mark a page as deferred if it’s not one of your top pages using the
deferkey increatePageaction.
#Adding Analytics to Your Site
Already have your analytics tool set up on your site? Then you can skip this step.
Use gatsby-plugin-plausible (opens in a new tab) to add the necessary tracking script to your site.
npm install gatsby-plugin-plausibleAdd the plugin to your gatsby-config.mjs and provide the necessary domain option.
const config = {  plugins: [    {      resolve: `gatsby-plugin-plausible`,      options: {        // The "domain" is what you chose as an identifier and what comes up in the URL:        // https://plausible.io/<domain>        domain: `gatsby-dsg-example`,      },    },  ],}
export default config
Be sure to commit and push your change so that the tracking goes live and you can gather some data. If you don’t have many visitors yet you can also click around with a couple of devices of your own to generate some data 😋
Not using Plausible Analytics?
If you’re not using Plausible or don’t want to, you can use different plugins to add your analytics tool to your site. For example:
Or use the plugin library (opens in a new tab) to find the fitting plugin.
#Deploying to Netlify
Already use Netlify to build & host your site? Then you can skip this step.
Follow Netlify’s Get Started guide (opens in a new tab) to connect and deploy your site inside the repository.
#Creating A Source Plugin
So you’ve added analytics to your site, gathered some data, and deployed the site to Netlify. The Plausible dashboard might look something like this:
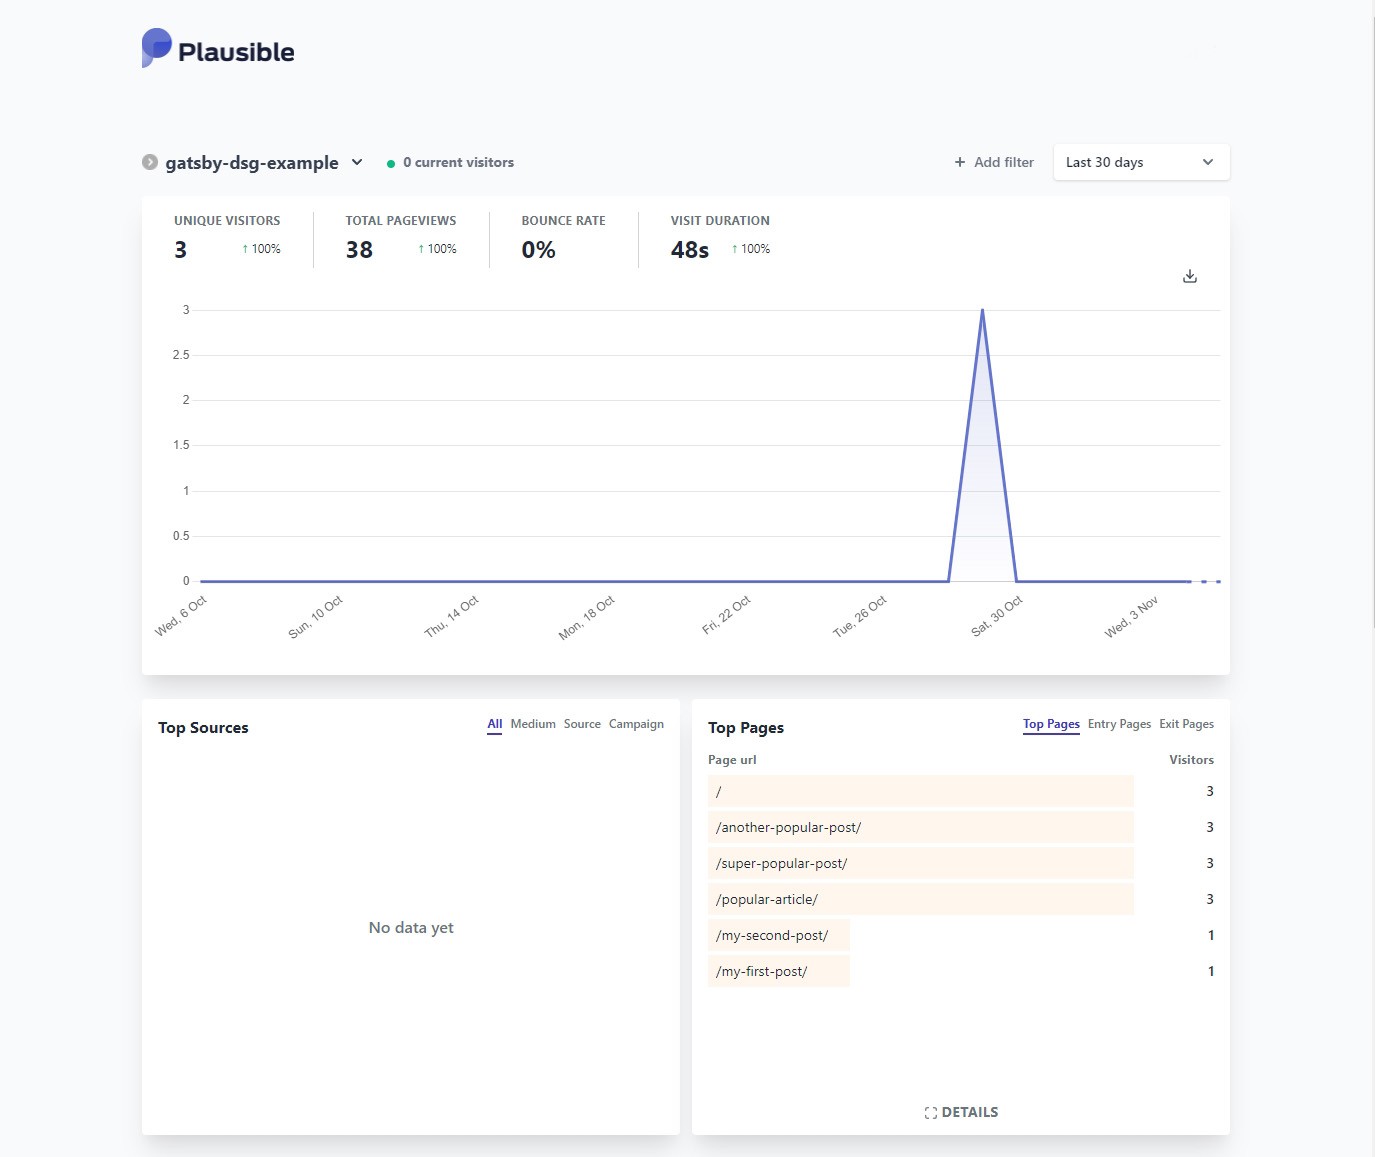
The information from the Top Pages box is what you’ll need to access. And you can do that through Plausible’s API. The Stats API Reference documentation (opens in a new tab) explains how and we’ll get back to the details there later. But first, go to plausible.io/settings (opens in a new tab) and obtain an API key. Save it inside an .env file in the root of your project with PLAUSIBLE_API_KEY=your-key.
Not using Plausible Analytics?
While you won’t be able to copy/paste the results of each step, you can still follow them. The API endpoint or authentication might be different, or the shape of the result in a slightly different form. But the general idea is the same:
- Go to your analytics tool’s API documentation and check if you need to authenticate requests with them and how. Obtain that authentication then and save it e.g. inside an
.envfile - Request the specific API endpoint to get the top pages of your site
- Create GraphQL nodes with the result
For Google Analytics there’s even an existing plugin called gatsby-source-google-analytics-reporting-api (opens in a new tab). For reference, you can also check out the Creating a Source Plugin (opens in a new tab) guide from Gatsby.
#Local Plugin
Instead of placing the logic for Plausible inside your gatsby-node file at the root of your repository, you should create a local plugin (opens in a new tab) instead. This way your own “gatsby-source-plausible” is easily reusable across your projects.
Start by creating the folder structure /plugins/gatsby-source-plausible and create both a package.json and gatsby-node.mjs inside it.
/your-gatsby-site└── gatsby-config.mjs└── /src└── /plugins └── /gatsby-source-plausible |── gatsby-node.mjs └── package.jsonFor the package.json use the following contents:
{ "name": "gatsby-source-plausible"}Go into plugins/gatsby-source-plausible and run npm install node-fetch.
Lastly, create some boilerplate code inside gatsby-node.mjs for the next step:
import fetch from "node-fetch"const POST_NODE_TYPE = `PlausibleTopPage`
export const sourceNodes = async ( { actions, createNodeId, createContentDigest }, { siteId, apiKey }) => { const { createNode } = actions}#Retrieving Data & Creating Nodes
The Plausible Stats API Reference (opens in a new tab) explains the /api/v1/stats/breakdown endpoint and already has an example for “Top Pages” further below (opens in a new tab):
curl https://plausible.io/api/v1/stats/breakdown?site_id=$SITE_ID&period=6mo&property=event:page&limit=5 -H "Authorization: Bearer ${TOKEN}"Here, for a period of 6 months the top 5 pages are returned for the given site id. By default, the limit is 100. Translating that curl command into the shape of node-fetch looks something like this:
import fetch from "node-fetch"const POST_NODE_TYPE = `PlausibleTopPage`const API_ENDPOINT = `https://plausible.io/api/v1/stats/breakdown`
export const sourceNodes = async (  { actions, createNodeId, createContentDigest },  { siteId, apiKey }) => {  const { createNode } = actions
  const API_URL = `${API_ENDPOINT}?site_id=${siteId}&period=6mo&property=event:page`
  const response = await fetch(API_URL, {    headers: { Authorization: `Bearer ${apiKey}` },  })  const body = await response.json()}
The siteId and apiKey in the second argument of the sourceNodes function are plugin options that get passed through when you set them inside gatsby-config. The constructed API_URL endpoint is the same as Plausible’s example except for the removal of the limit param.
To authenticate your request to Plausible you set an Authorization header in the request using the bearer token method (What is a Bearer Token? (opens in a new tab)). As response is only a Response stream, you need to use .json() to read it to completion and to get data you can actually work with.
All that is left now is to actually create GraphQL nodes from the API response! Use createNode (opens in a new tab) to loop over the response and create nodes. In the next step you’ll then be able to query allPlausibleTopPage. The complete gatsby-node.mjs file:
import fetch from "node-fetch"const POST_NODE_TYPE = `PlausibleTopPage`const API_ENDPOINT = `https://plausible.io/api/v1/stats/breakdown`
export const sourceNodes = async (  { actions, createNodeId, createContentDigest },  { siteId, apiKey }) => {  const { createNode } = actions
  const API_URL = `${API_ENDPOINT}?site_id=${siteId}&period=6mo&property=event:page`
  const response = await fetch(API_URL, {    headers: { Authorization: `Bearer ${apiKey}` },  })  const body = await response.json()
  body.results.forEach((page) => {    createNode({      id: createNodeId(`${POST_NODE_TYPE}-${page.page}`),      slug: page.page,      visitors: page.visitors,      parent: null,      children: [],      internal: {        type: POST_NODE_TYPE,        content: JSON.stringify(page),        contentDigest: createContentDigest(page),      },    })  })}
Each node needs a unique id and by using the helper function createNodeId you’re ensuring that’s the case. slug and visitors will be queryable later, the keys on internal help Gatsby to correctly track and garbage collect nodes.
#Using GraphiQL
Congrats, you wrote a source plugin! Time to test it out and see if it all works. Before you can start the development server, you first need to add your newly created local plugin to gatsby-config.mjs. When using .env files you’ll also need to initialize dotenv. You saved the PLAUSIBLE_API_KEY earlier in an .env file, and the siteId is the same thing as the domain for gatsby-plugin-plausible.
require("dotenv").config()
const config = {  // Rest of your gatsby-config.mjs...  plugins: [    // Rest of your plugins...    {      resolve: "gatsby-source-plausible",      options: {        apiKey: process.env.PLAUSIBLE_API_KEY,        siteId: `gatsby-dsg-example`,      },    },  ],}
export default configDon’t forget to also set PLAUSIBLE_API_KEY inside Netlify as an environment variable. Otherwise the plugin won’t be able to pull the information from Plausible’s API. Navigate to Site configuration > Environment variables to add a new value.
Now, in the root of your project start the development server with gatsby develop and go to http://localhost:8000/___graphql and run the following query:
query MyQuery { allPlausibleTopPage { nodes { slug visitors } }}If everything went well you should see something like this:
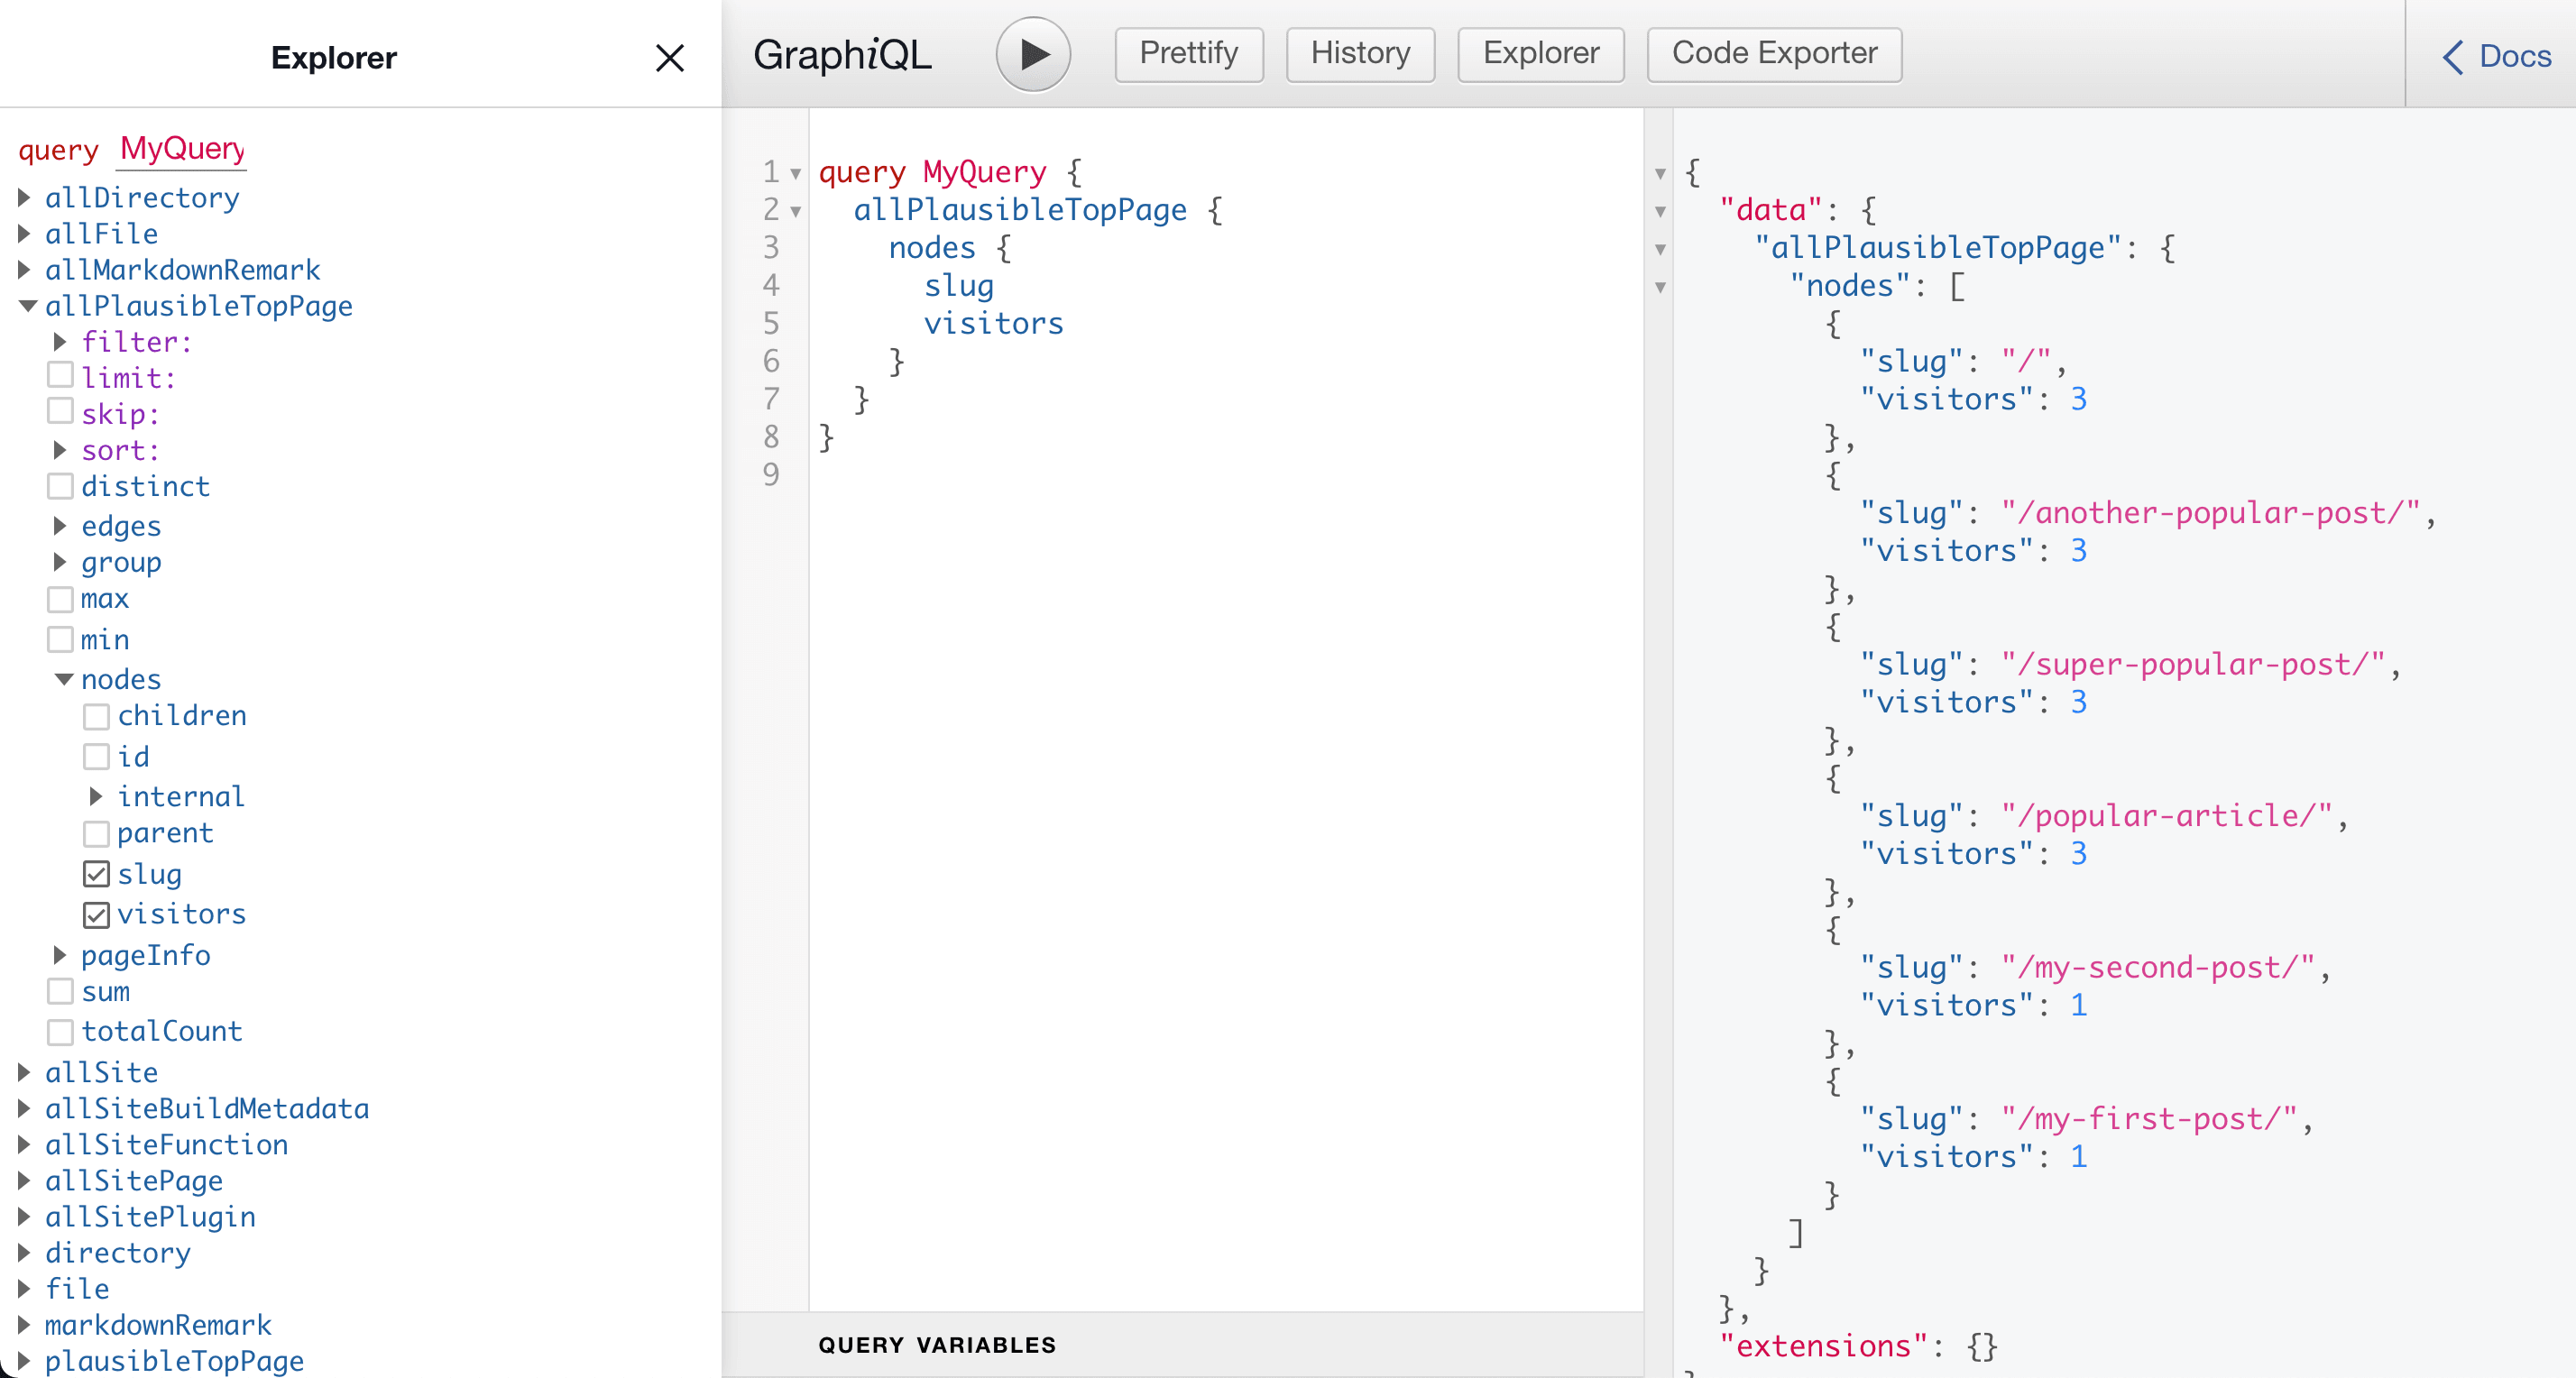
Now it’s time for you to interpret the data you see. In this instance the index page and three more pages have the most views by some margin. You might see something similar: The index page & a cohort of pages with the most views, then a noticeable gap, and the rest of the pages. Depending on this metric you should now decide how many pages from that top pages you want to mark as SSG. (For the sake of this tutorial three will be chosen).
#Deferring Low-Traffic Pages
You’re nearly there! The last piece of this puzzle is to use the data you get from allPlausibleTopPage in your page creation logic inside gatsby-node.js of the project. Stop the development server (if you haven’t already) and go to your gatsby-node.js file at the root of your project (not the gatsby-node.mjs of the plugin). Here’s an example file that creates pages from Markdown files, you’ll need to adapt the workflow to your own file below.
const templatePath = require.resolve(`./src/templates/blog-post.jsx`)
exports.createPages = async ({ graphql, actions }) => {  const { createPage } = actions
  const result = await graphql(`    {      posts: allMarkdownRemark {        nodes {          frontmatter {            slug          }        }      }    }  `)
  result.data.posts.nodes.forEach((post) => {    const slug = post.frontmatter.slug    createPage({      path: slug,      component: templatePath,      context: {        slug: slug,      },    })  })}
Querying data (in this case markdown) and creating pages through the createPage action. A pretty typical createPages API call. Extend the GraphQL call with the allPlausibleTopPage type:
{ # + Your existing queries plausible: allPlausibleTopPage( sort: { fields: visitors, order: DESC } filter: { slug: { ne: "/" } } limit: 3 ) { nodes { slug } }}And this now really shows the power of Gatsby’s GraphQL data layer and the query options you have with it:
sort: The result is filtered byvisitorsin a descending order, so the pages with the most visitors are at the topfilter: Filter out the index page as we don’t want to defer itlimit: Only return 3 items
The result will be an array of objects with the slug key. For easier comparison you should convert it to an array just containing the slugs. Lastly, you’ll be comparing the slug from allPlausibleTopPage with the current page post.frontmatter.slug to set the defer key on the createPage call.
The complete gatsby-node.js looks something like this:
const templatePath = require.resolve(`./src/templates/blog-post.jsx`)
exports.createPages = async ({ graphql, actions }) => {  const { createPage } = actions
  const result = await graphql(`    {      posts: allMarkdownRemark {        nodes {          frontmatter {            slug          }        }      }      plausible: allPlausibleTopPage(        sort: { fields: visitors, order: DESC }        filter: { slug: { ne: "/" } }        limit: 3      ) {        nodes {          slug        }      }    }  `)
  const plausibleTopPages = result.data.plausible.nodes.map((page) => page.slug)
  result.data.posts.nodes.forEach((post) => {    const slug = post.frontmatter.slug    const isTopPage = plausibleTopPages.includes(slug)    createPage({      path: slug,      component: templatePath,      context: {        slug: slug,      },      defer: !isTopPage,    })  })}
As at the time of writing this, DSG is not run in gatsby develop you’ll need to run gatsby build and gatsby serve to see it in action now!
You can check if it worked by looking at the build output at the end of gatsby build:
┌ src/templates/blog-post.jsx│ ├   /popular-article/│ ├   ...2 more pages available│ ├ D /my-first-post/│ └ D ...2 more pages available└ src/pages/index.jsx  └   /
  ╭────────────────────────────────────────────────────────────────╮  │   (SSG) Generated at build time                                │  │ D (DSG) Deferred static generation - page generated at runtime │  │ ∞ (SSR) Server-side renders at runtime (uses getServerData)    │  │ λ (Function) Gatsby function                                   │  ╰────────────────────────────────────────────────────────────────╯
So as expected, the index page is SSG, and three posts are marked as DSG (and the correct ones). Great! 🎉 Time to see in action on Netlify. Commit your changes and push it to trigger a build on Netlify (if you work on a feature branch you’ll need to open a PR to trigger a build).
Go to some pages that are marked as deferred. The first request might take a bit longer, after that the requests to other DSG pages should be fast.
You can also see it working in Netlify directly. For this, go to the Functions site and view the DSG function logs.
#Next Steps
Congrats, you programmatically deferred low-traffic pages using data from your analytics tool! Now it’s your task to further personalize which pages to defer and what indicators to use. Maybe use the realtime visitors of a page or filter by specific campaigns you’re running.
I hope this also sparked your imagination of what other data sources and methods you could use to programmatically use Deferred Static Generation. Did you build something cool with Deferred Static Generation? Let me know on Twitter at lekoarts_de (opens in a new tab)!